Block printing
Some of our most successful work is in giving block printing demonstrations to school groups and others. Both Arthur Liberty and William Morris used block printing in their Merton print works. The process we use is much simplified from the true commercial processes, but these images are a good illustration of the basic prinicples. School groups are shown a video of work at the David Evans factory as part of a talk before they try their hand at printing so they can compare the two processes.
For a movie version Film A shows Mary pinning out silk for printing, and Film B the printing process (both files c 5Mb). For a good detailed description of the process, see Bill Rudd's excellent " Liberty Print Works - Wartime Remembrances" published as 'Local History Notes - 8' by Merton Historical Society.
Click on a thumbnail image to see a larger clearer version
We accept bookings from all groups. Prices on request. As a guideline a school group booking is charged at £15 plus £0-50p per pupil.

|
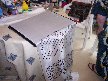
Laying out the silk: In commercial production a long table would be prepared with adhesive to which the silk would be fixed while printing took place, to ensure a perfectly even surface. We use pins.
[Full size image 44kb] |
|
|
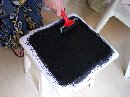
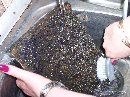
In a perfect world we would have a proper tierer's trolley, with a surface inked to exactly the right degree. This shows our hand made alternative being inked by roller .
[Full size image 47kb] |
|
|
The block: Normally one of a set of 3 or more which are over printed to produce the final pattern.
[Full size image 61kb] |
|
|
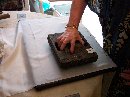
Inking the block: The block is placed down on the pad 2 or 3 times to get an even spread of ink across the raised surface of the design .
[Full size image 46kb] |
|
|
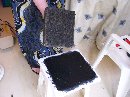
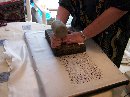
Placing the block: The block is carefully positioned on the silk. The pitch pins at each corner enable the block to be positioned precisely where required to make a consistent pattern. These pins get damaged easily, and few of our blocks have them in the right place.
[Full size image 61kb] |
|
|
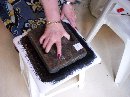
The Maul: This is 7lbs of lead on a wooden handle. It is the handle which is tapped down once on each corner and once in the middle to make sure contact is even across the block. Note how the maul is held - it is not a hammer!.
[Full size image 46kb] |
|
|
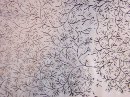
The print: We are using blocks which were only saved because they had become tired from over use. Some unevenness in pattern is inevitable .
[Full size image 56kb] |
|
|
A sample print being prepared on silk with a number of different designs.
[Full size image 61kb] |
|
|
Cleaning up: The blocks must be cleaned after each session, if the design is not to be clogged up.
[Full size image 83kb] |
|